Getting Started: Running the “Google
Map” demo
Required Hardware
The
demo can only be run on the following hardware platforms:
1.
PIC24FJ256DA210
Development Board (DM240312) – Refer to Configuration 1 for
supported display panels.
2.
PIC32
Ethernet Starter Kit (DM320004) on the PIC32
Multimedia Expansion Board (DM320005) – Refer to (Configuration 3) for
details.
Configuring the Hardware
Running
the demo on different supported boards will require additional settings on the
hardware.
1.
PIC24FJ256DA210
Development Board (DM240312) –
a.
The demo
requires the use of 512Kbyte SRAM. By default, only the 256Kbytes of the SRAM
is enabled. Set jumper JP11 to short 2-3 to enable the use of the 512Kbyte
SRAM. Refer to Configuring
the Hardware (Configuration 1: PIC24FJ256DA210 Development Board) for
details of the default settings on the board and how to set up the hardware.
b.
Connect one of
the following Ethernet PICtail Plus Daughter Boards
to the PIC24FJ256DA210 Development Board PICtailTM
Plus connector (J8):
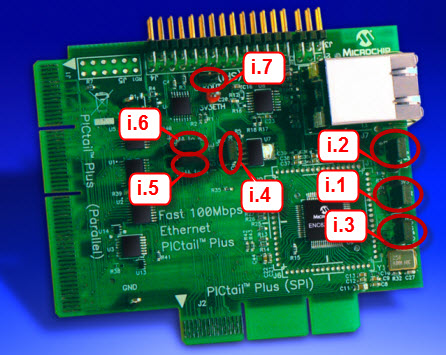
i.
Fast
100Mbps Ethernet PICtail Plus Daughter Board
(AC164132) Set the jumpers on the board to:
1.
JP9 – 3V3 –
PSPCGF2
2.
JP10 – 3V3 –
PSPCFG3
3.
JP11 –
PSPCFG1&4 - GND
4.
JP2 – shorted
5.
JP8 – shorted
6.
JP7 – open
7.
JP3 – don’t care
ii.
Ethernet
PICtail Plus Daughter Board (AC164123)
c.
Connect the ethernet cable to the RJ45 ethernet
jacks of the chosen Ethernet PICtail Plus Daughter Boards.
2.
PIC32
Ethernet Starter Kit (DM320004) on the PIC32
Multimedia Expansion Board (DM320005) – There are no special settings when
using this boards. Refer to Configuring
the Hardware (Configuration 3: PIC32 Multimedia Expansion Board) for
details on how to set up the hardware. Just connect the ethernet
cable to the RJ45 ethernet jack of the PIC32 Ethernet
Starter Kit.
Demo Compatibility Matrix
This
is the implementation of the basic Google Maps™ functionality in a PIC device.
The user can enter an address or select from a pre-selected addresses to
display a static map. For details on how
static maps are handles refer to: http://code.google.com/apis/maps/documentation/staticmaps/ for details.
The
demo has a main menu where the user can zoom in or zoom (using the +, - buttons
or the slider) out of the displayed map. User can select the view mode and
enter new or predefined address using the four buttons:
1.
MAP – selects
the map view
2.
SATELLITE –
selects the satellite view
3.
TERRAIN– selects
the terrain view
4.
ADDR – enters
the address selection menu. This menu allows the user to enter a new address
using the qwerty keyboard on the screen or select from
the predefined addresses using the PRESET button. As soon as the user hits the
DONE button, the map is retrieved and displayed.
This
demo does not implement scrolling on the map since scrolling is not implemented
in the static map API of Google.
The Microchip name and
logo, the Microchip logo, MPLAB, and PIC are registered trademarks of Microchip
Technology Incorporated in the
PICDEM and PICTail are trademarks of Microchip Technology Incorporated
in the
SD is a trademark of the
SD Association in the U.S.A and other countries
Microsoft, Windows,
Excel, and Windows Vista are either registered trademarks or trademarks of
Microsoft Corporation in the